Safous ZTNA service has a unique feature where customers can create an authentication federation for all IdPs that are integrated with Safous ZTNA service. This feature is called the SaaS App and essentially acts as the SAML IdP while conducting Single Sign-On (SSO) with the service providers. Additionally, this application is beneficial for connecting to SaaS applications, enabling a straightforward SaaS SSO operation using the Safous ZTNA IdP as the sole IdP for conducting the SSO.
To create a SaaS application, you need to have admin user privileges to configure your environment, including adding applications. For more information on Admin access, please refer to the KB article below:
- Login to https://portal.safous.com
- Go to Settings tab> ZTNA
- In the Application, choose SaaS
- Click New SaaS, it will expand multiple forms to be filled for new application

- Fill Name information, which is a required field and must have a unique value compared to other applications

- Site field is required, and by default, it uses 'all', which you can leave unchanged. However, for multisite deployments, it's recommended to choose the correct site based on the application location

- Domain is required, but it will show the default domain that your tenant currently registered

- ACS URL/Login URL is the required value, which is a URL endpoint on the service provider (SP) where the identity provider will redirect to with its authentication response

- Entity ID is required, which is a unique identifier that represents the intended audience of the SAML assertion. This is typically the SP Entity ID of the application as defined in the service provider metadata file under entityID.

- Relay State is also a required value, where the SP can send a certain value to the IdP along with the Authentication request and then receive the same value back. Relay State is used by the IdP to signal to the SP which URL the SP should redirect to after a successful sign-on.

- Encrypt SAML Assertion, by default, is disabled. If you enable this option, you will also need to input a certificate from SP, because it is used to encrypt the assertion for a SaaS mapping

- Visible toggle allows you to choose whether to make it visible (green) in the user portal or not (by default it's disabled)

- Icon allows you to upload your preferred custom logo; if not, it will use a default logo.

- Allow IDP-Initiated Flow is enabled by default and is used for a SaaS mapping initiated by the IdP. You can leave this as is.

- Use URI suffix as relay state parameter is disabled by default, specifying whether you want the relay state to be relative for SaaS mapping or not.

- Fill Name information, which is a required field and must have a unique value compared to other applications
- Once every field has been filled and chosen, the only thing left to do is click "Save."

- Then it will give a successful notification

- Once created, you can access the application settings where you will find detailed information about the SSO URL, Issuer, and Metadata needed for SP SAML integration

Service Provider Side - Configuration
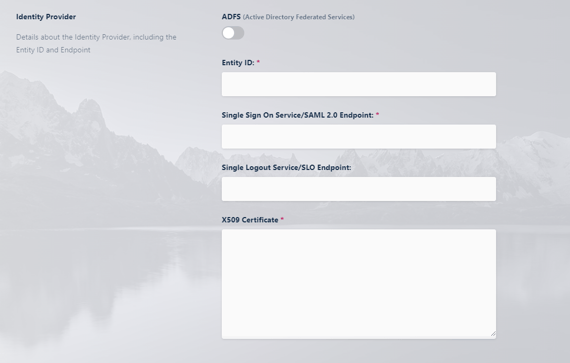
You can choose any service provider that aligns with your needs and also supports SAML IdP (Identity Provider) integration. Typically, input forms like the ones below will be shown on the Service Provider side (similar to ACS URL, Entity ID, and Relay State information in the section above):

- Fill Entity ID with the below information from the Safous SaaS application

- Fill SSO Service/SAML Endpoint with the below information from the Safous SaaS application

- Fill x509 Certificate with the below information from the Safous SaaS application

