This article describes the steps needed to enable Single Sign On (SSO) into Microsoft Entra ID-based services (including Microsoft 365, Azure, and Intune) by SAML for your Safous tenant's local users.
Prerequisites
- You have admin access to your Microsoft tenant
- You have added a verified domain to your Microsoft tenant
- You have admin access to run Windows PowerShell
Set Up User in Safous Admin Portal
You can choose to create a new user or edit an existing user to integrate with Microsoft account. Below are the steps you need to create a new user account
- Go to Settings > ZTNA > Accounts > Users then click the New User button.
- Fill the username and email field in UPN format (e.g. user1@yourdomain.com).
- Click Save.
Below are the steps you need to edit an existing user account
- Go to Settings > ZTNA > Accounts > Users
- Click the "+" button next to the user you choose and click edit.
- Edit the username and email field and fill in the new data in UPN format (e.g. user1@yourdomain.com).
- Click Save.
Set Up a Microsoft SaaS application in Safous Admin Portal
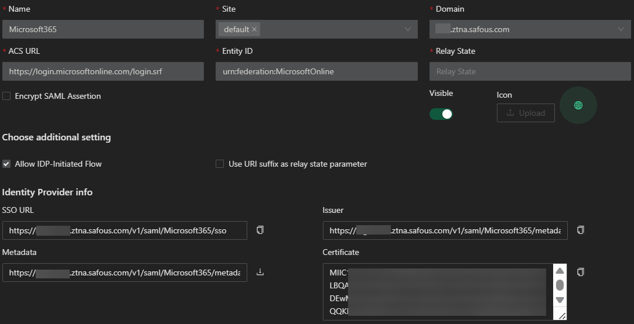
- Go to Settings > ZTNA > Applications > SaaS then click the New SaaS button.
- Enter the name for your Microsoft SaaS application or just simply name it Microsoft365
- Choose the site from the available list.
- Fill in the ACS URL with "https://login.microsoftonline.com/login.srf"
- Fill in the Entity ID with "urn:federation:MicrosoftOnline"
- Specify the Relay State for the SaaS application by filling in the Relay State URL field. By default, the user will be directed to https://office.com
- Enable the Allow IDP-Initiated Flow button.
- Configure the Categories and Policies to associate to the application.
- Click Save. The configuration of your registered SaaS application should resemble the image below.
Connect to Microsoft 365 through Powershell
- Open Windows Powershell with admin access
- Set PowerShell script execution policy to remote signed or less restrictive. You can set it by running the command below:
Set-ExecutionPolicy -ExecutionPolicy RemoteSigned -Scope CurrentUser
- Download Microsoft Graph module and MSOnline module by running the command below.
Install-Module Microsoft.Graph -Scope CurrentUser

Install-Module MSOnline - Verify the installation succeed by running the commands below:
Get-InstalledModule Microsoft.Graph

Get-InstalledModule MSOnline - Get access to Microsoft 365 resources by running the commands below:
Connect-MgGraph -Scopes "User.ReadWrite.All","Domain.ReadWrite.All"
You will be prompted to log in to your Microsoft account. Make sure you log in with the admin account or an account with a sufficient permissions. If you connect to Graph PowerShell for the first time, you will need to grant consent for the defined scopes.
Connect-MsolService
Convert Managed Domain to Federated Domain
- Verify the current status of your domain:
Get-MgDomain -DomainId <domain>
The result should resemble the image below:

- Run the Set-MsolDomainAuthentication cmdlet to Convert your managed domain to a federated domain.
The required parameters are listed below:
• DomainName ─ Your verified domain name
• Authentication ─ Set it to federated in order to enable SSO
• PassiveLogOnUri ─ The SSO URL for your Microsoft SaaS application
• SigningCertificate ─ The X509 certificate generated for your Microsoft SaaS application
• IssuerUri ─ The Issuer URL for your Microsoft SaaS application
• LogOffUri ─ Set it to this URL https://login.microsoftonline.com/logout.srf
• PreferredAuthenticationProtocol ─ Set it to SAMLP
For more information, you can refer to the official documentation.
Below is the example usage of the command$dom = "<Your domain>"
$LogOnUrl = "https://<Your Safous Tenant>.ztna.safous.com/v1/saml/<Your Microsoft SaaS name>/sso"
$LogOffUrl = "https://login.microsoftonline.com/logout.srf"
$issueruri = "https://<Your Safous Tenant>.ztna.safous.com/v1/saml/<Your Microsoft SaaS name>/metadata"
$MySigningCert = "<X509 Certificate>"
$Protocol = "SAMLP"
Set-MsolDomainAuthentication `
-DomainName $dom `
-Authentication Federated `
-PassiveLogOnUri $LogOnUrl `
-SigningCertificate $MySigningCert `
-IssuerUri $issueruri `
-LogOffUri $LogOffUrl `
-PreferredAuthenticationProtocol $Protocol - Verify that your managed domain has been converted to a federated domain by running the command below:
Get-MsolDomainFederationSettings -DomainName <Your Domain> | fl *
The result should resemble the images below:
Get-MgDomain -DomainId <Your Domain>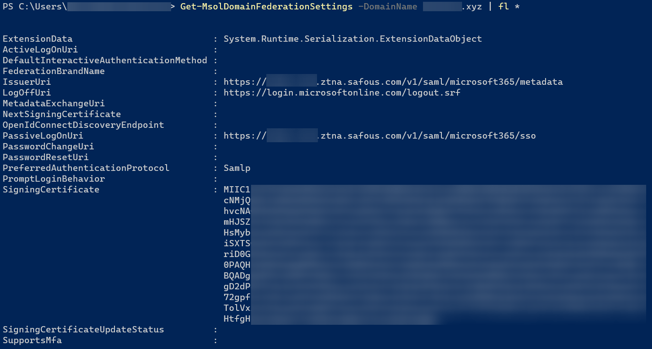

Set Up User in Microsoft
- Run the New-MgUser cmdlet to create a new user in Powershell.
The required parameters are listed below:
• Id ─ Set it to the same username and email value used in Safous
• UserPrincipalName ─ Set it to the same username and email value used in Safous
• DisplayName ─ Set a suitable display name for the user
• UsageLocation ─ Set it to a matching two-letter country code (ISO standard 3166)
• PasswordProfile ─ Set it in hash table format (e.g. @{Password = 'password'})
• AccountEnabled ─ Already set to true by default when specifying the parameter
• mailNickname ─ Set a suitable mail nickname for the user
For more information, you can refer to the official documentation
Below is the example usage of the command:
New-MgUser -Id test-user@domain -UserPrincipalName test-user@domain -DisplayName test-user -UsageLocation US -PasswordProfile @{Password = 'password'} -AccountEnabled -mailNickname test-user
Below is the result of the command above:
- Get the available licenses for your tenant:
Get-MgSubscribedSku
You can filter the result to only display the SKU Id of your subscription by specifying your Subscription's SKU part number (e.g. DEVELOPERPACK_E5). Here is the example:

Please refer to this document for more information regarding the subscription product name and service plan. - Assign license to user by running the command below
$license = Get-MgSubscribedSku -All | Where SkuPartNumber -eq 'DEVELOPERPACK_E5' | Select SkuId
Here is the result:
Set-MgUserLicense -UserId user@domain -AddLicenses @{SkuId = $license} -RemoveLicenses @()
- Now you should be able to login with SSO.
Test the SSO (SP-Initiated)
- Go to any Microsoft portal (e.g. portal.office.com, portal.azure.com, etc)
- Enter the previously added user's email.
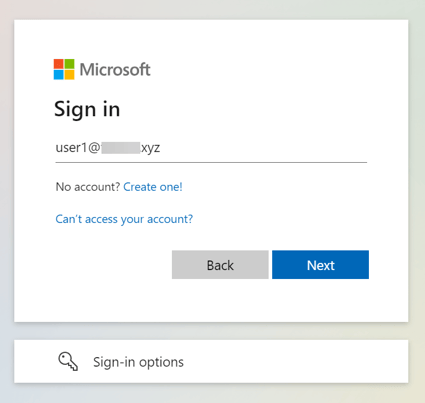
- You will be redirected to your Safous tenant User Portal
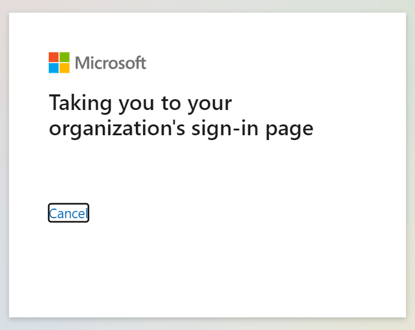
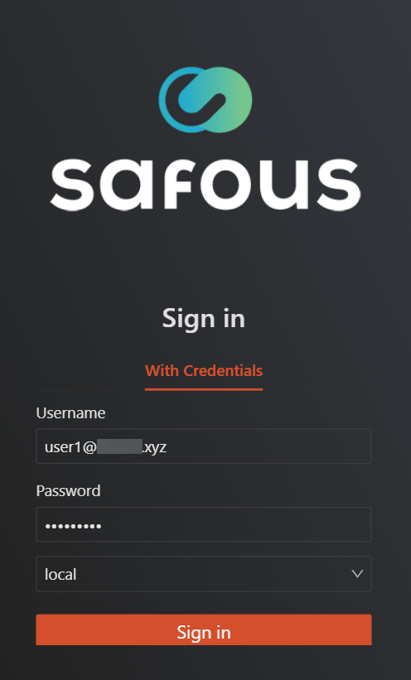
- Log in with the matching username and password
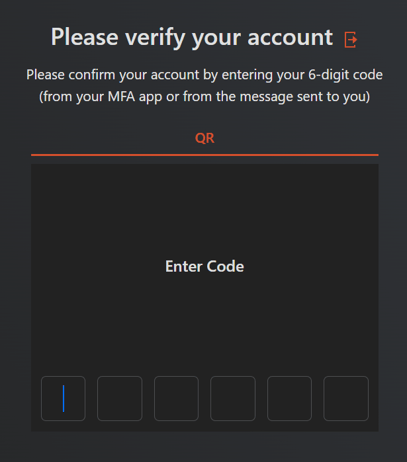
- Fill in the MFA code
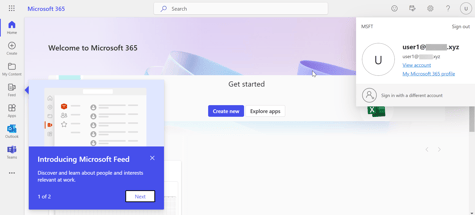
- You will be logged in to the Microsoft service.

- You can access any services available in your license.
Test the SSO (IdP-Initiated)
- Log in to your Safous tenant user portal
- Click on the Microsoft SaaS application
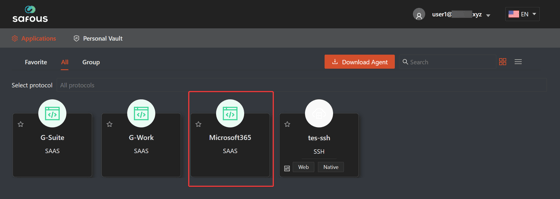
- You will automatically be logged in to Microsoft and directed to the service's URL
Troubleshooting
- If you see this message when trying to log out from Microsoft SaaS,

Based on Microsoft documentation, the cause is possibly because the web browser may have a cookie that isn't updated to expire and finish the sign-out process. To resolve this problem, you just need to clear your browser cookies or just simply close and reopen the browser as it will automatically expire the cookie and logs you out. Please refer to this documentation for more information regarding this problem. - If you see this message when trying to run the Connect-MgGraph command:

- Possible cause:
You did not have the Microsoft.Identity.Client module installed
Solution:
Run this command in the PowerShell:Install-Module -Name Microsoft.Identity.Client -RequiredVersion 4.44.0.0
After the installation succeed, close the PowerShell Window. Then reopen the PowerShell with admin access and run the Connect-MgGraph command again. Now you should be prompted to log in to Microsoft properly. - Possible cause:
You ran the Connect-MsolService command before the Connect-MgGraph command
Solution:
You should close the PowerShell window. Then reopen the PowerShell with admin access and run the Connect-MgGraph command again. Now you should be prompted to log in to Microsoft properly.
- Possible cause:
- If you try to create the Microsoft user anywhere not from the PowerShell command (e.g. Microsoft admin, Microsoft Entra Id), you would get an error message like this:
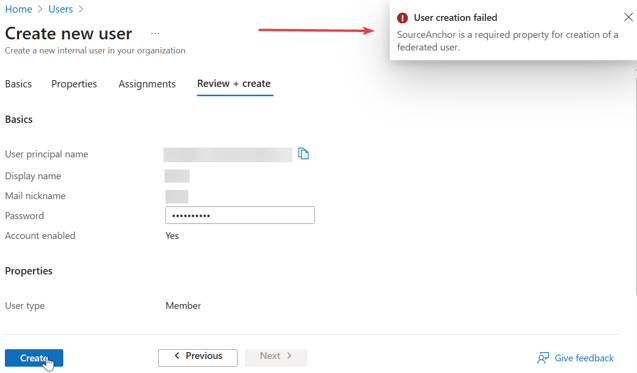
This is because Microsoft expect the federated domain to sync to Azure AD Connect, which in this case the Safous local user are not created through Azure AD so the SourceAnchor attribute mentioned are not available. Possible solution for now is to use the PowerShell to create Microsoft user as explained in the steps mentioned in this article. - If you try to create user not from the PowerShell prior to enabling federation (before verifying domain), you will get this kind of error:
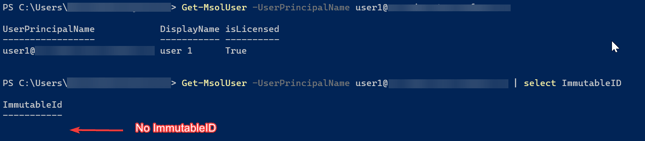
This ImmutableID attribute is very important as it is being used as the attribute Microsoft look for on the SAML Assertion when a user try to SSO to a Microsoft service. If you experienced this kind of error, the possible solution is to set the ImmutableID manually for that user by using either the MgGraph or MSOnline module in PowerShell.