Background
Webhooks are user-defined HTTP callbacks (or small code snippets linked to a web application) that are triggered by specific events. Whenever the trigger event occurs in the source site, the webhook sees the event, collects the data, and sends it to the URL specified in the form of an HTTP request.
The difference between API calls and webhooks is that the former work on request-based output mechanisms and the latter work on event-based output mechanisms.
This article explains how to integrate webhooks in Safous with 3rd party (via API) as policy conditions.
Webhook Configuration with Get Method
Step 1: In the Admin Portal, navigate to the Policies > Advanced Rule > Rules (Custom) screen as shown below. The table will be empty if you have not previously integrated webhooks:
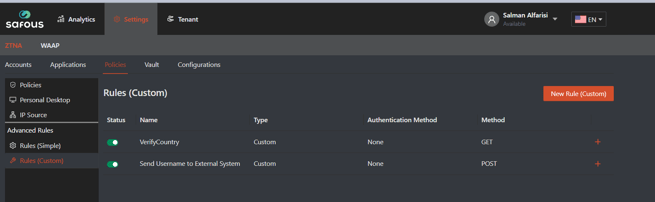
Step 2: To add a new webhook integration, click on the orange New Rule (Custom) button in the right hand corner.
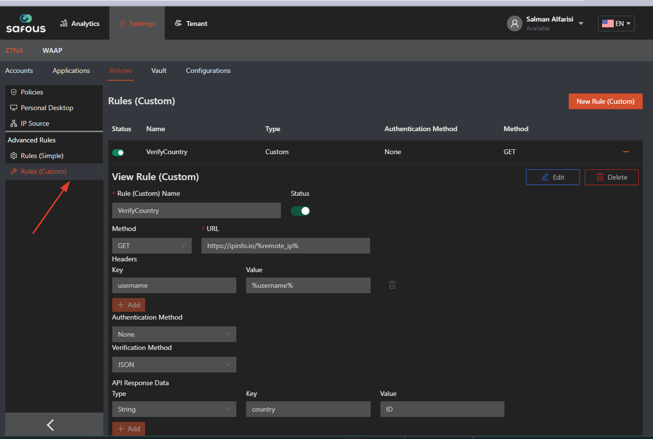
Step 3: Enter the Rule (Custom) name, select GET as Method, and enter the URL.
Step 4: To add Headers, click the orange Add button and enter the Key and Value for Headers. You can add as many headers as you’d like. When entering headers, enter a static one, or include parameters (%param%) from the client request. Please see the list in the section below entitled “Parameters for Headers and Body,”
Step 5: Enter the Authentication method. The options include:
-
None
-
Basic: Enter username and password
-
OAuth: Token URL, Client ID, Client Secret
Step 6: Enter Verification methods. JSON or JSONP are the content types of the API.
Webhook Configuration with Post Method
Step 1: In the Admin Portal, navigate to the Policies > Advanced Rule > Rules (Custom)
Step 2: To add a new webhook integration, click on the orange New Rule (Custom) button in the right hand corner.
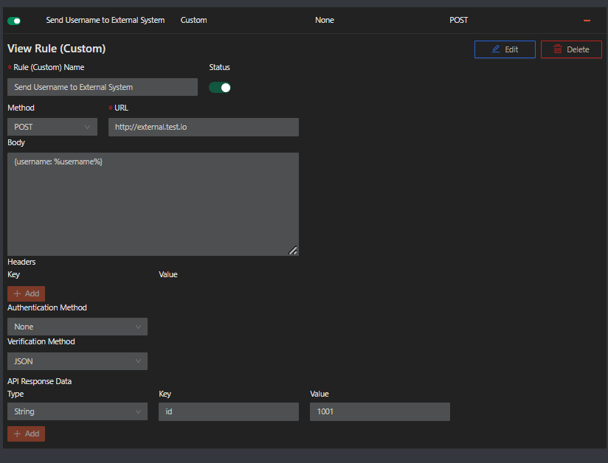
Step 3: Enter the Rule (Custom) name, select POST as Method, and enter the URL.
Step 4: Enter the Request Body information. You can define body parameters using the ones listed below or in Step 4 above.
Step 5: To add Headers, click the orange Add button and enter the Key and Value for Headers. You can add as many headers as you’d like. Please see below for the list of parameters.
Step 6: Enter the Authentication method and the Validation method as noted above in Steps 5 and 6.
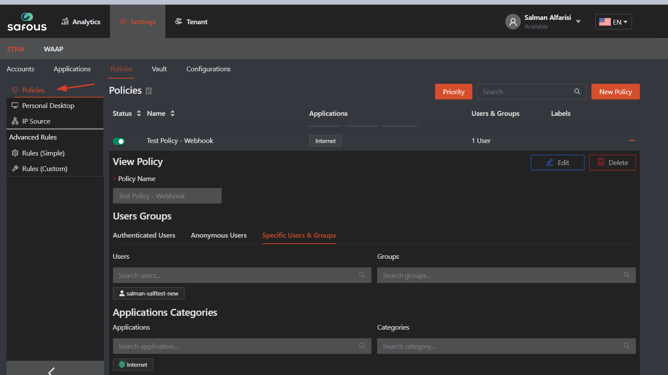
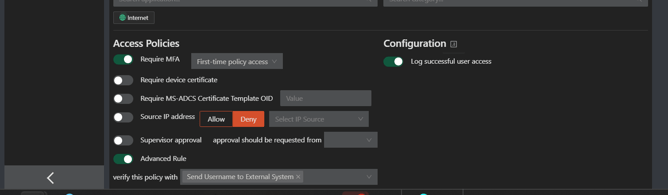
In order for webhook integrations to work, the integration must be enabled in the Policy as in the screenshot below.
API Response Action
For either Get or Post methods, enter the API Response Action information for Type, Key and Value. You can add as many API Response Actions as needed by clicking the orange Add button.
Parameters for Headers and Body
As noted above, parameters can be used for headers and body in the Post method. When using the Get method, parameters are available for headers. Enter a static one, or include parameters (%param%) from the client request. Below is a list of webhook parameters that Safous sends:
%username%
%internal_addr%
%user_agent%
%remote_ip%
%cert_thumbprint%
%cert_thumbprint_upper%
%cert_thumbprint_256%
%cert_thumbprint_256_upper%
%cert_name%
%cert_alt_name%
%device_id%
%groups%
%group_names%
%headers.XYZ% - sending the value of a specific header (e.g. headers.Accept-Language, headers.Authorization)
Troubleshooting
Please note that there is no autocomplete option when filling in the parameters (%param%).Logs
-
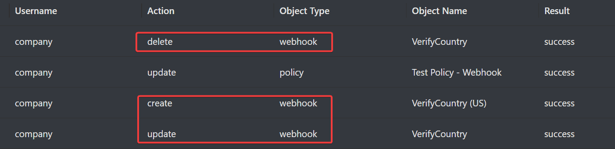
Creating, deleting, and editing webhooks are recorded in the Analytics > ZTNA > Audit Logs.
-
If access was denied based on failure to meet the webhook criteria, the report of the reason why access was denied are available in the Analytics > ZTNA > Activity Logs > Status Column.
Testing the Webhook
After you have enabled the integration in your policy, you can test it by accessing the application with the users you have specified to see the result. Below is the example result of the webhook configured above.
- Access will be granted if the webhook criteria are met

- Access will be denied if the webhook criteria are not met
