[PRA][ZTA] How to work with Active Directory
As mentioned in
Getting Started with Safous article, you can integrate with 3rd party identity service that leverage AD or LDAP authentication approach. To do that, please follow the steps listed down below:
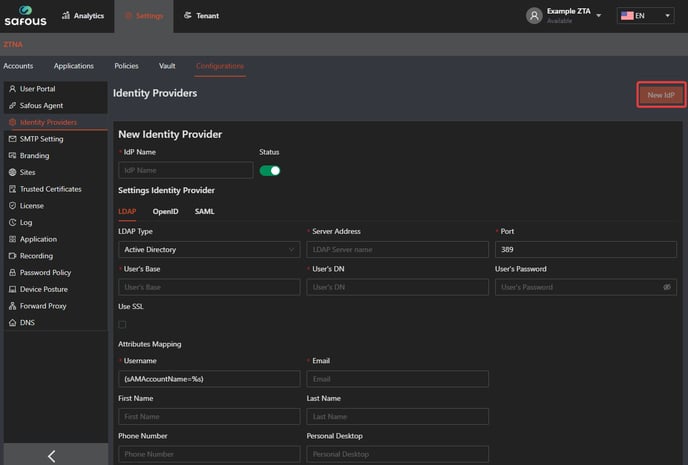
- Go to Settings tab > ZTNA > Configurations > Identity Providers. Click New IdP, it will expand the form of IDP which you will need to configure.

- Fill in the IdP name and ensure that the status of the IdP is enabled (green).

- Choose LDAP for the Identity Provider Settings.

- Choose Active Directory as the LDAP Type

- Fill in the target AD server. It can be in IP address format or FQDN format.

- Fill in the port to connect to the AD server. AD defaults to port 389, but if you are running on a non-standard port, change that value here. Note that for secured LDAP-S, the port is 636 and the "Use SSL" option should be checked.

- Fill in the Base Distinguished Name (DN) for your AD domain. (e.g. dc=example,dc=zta)

- Fill in the Distinguished Name (DN) for an account that has read permissions to add and sync users from the AD (e.g. cn=Administrator,cn=Users,DC=example,DC=zta)

- Fill in the password for the account.

- Click Use SSL only if you want to enable LDAP-S. If so, you must also set the port to 636.

- Attributes Mapping is used to map attributes between Safous and AD. By default, Safous will use the sAMAccountName from AD as the Safous username, and you will need to define the email attribute used by your AD to proceed. You can also choose to map other optional attributes listed here to your AD attributes.

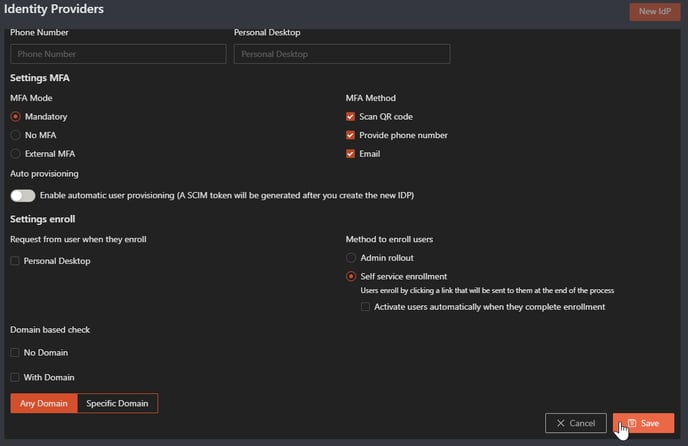
- You can configure settings for MFA by choosing the MFA mode and MFA methods. Available MFA mode options are Mandatory, No MFA, and External MFA. By default, it is set to Mandatory.

- In Mandatory MFA mode, the settings for MFA utilize Safous' built-in methods, which include scanning a QR code and providing a phone number. You can also enable MFA using Email if you have configured it as mentioned in this article.
- If you choose No MFA mode, the users who are using the IdP will not be asked to enter MFA when they login to the user portal.
- If you choose External MFA, Safous will delegate the users' MFA verification to the IdP. The available MFA methods defer to the MFA settings configured in that IdP.
- On the Settings enroll, you can request user information for Personal Desktop by enabling the option.

- You can choose the enrollment behavior for the Identity Provider that you wish to integrate.

- Admin rollout --- Means that every user needs to be added by the admin in Users page.
- Self service enrollment --- Means user who uses this IdP can directly be enrolled by themselves, but not yet activated. Enable Activate users automatically when they complete enrollment so the user can automatically be activated.
- Once you are done with the configuration, click "Save"

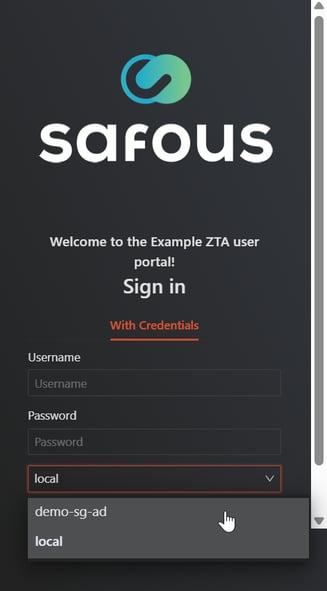
- If everything is configured correctly, you can log in to the user portal (https://login.<tenant>.ztna.safous.com) and choose to log in With Credential, where you will see your integrated AD option on the drop down.


