User account provisioning is an identity management process that ensures that user accounts are created, given proper permissions, changed, disabled, and deleted when needed.
System for cross-domain identity management (SCIM) 2.0 is a standardized definition of users and groups and consists of a pre-defined schema for common attributes like group name, username, first name, last name, and email.
This feature allows Administrators to automatically provision user information from an external IDP into Safous and maps the IDP’s user attributes to the named attributes in Safous so that the user's information is matched in both Safous and your IdP. We currently support profile creation, deletion, and updates for user profiles.
Prerequisites
-
In order to use this feature, you must configure a SAML or OpenID based external IdP prior to enabling SCIM. You can refer to these guides in order to configure them for Safous:
-
It is useful to be proficient on how to add, delete, edit, de-activate and re-activate users on your organization’s IdP.
Configuration
- Go to Settings > ZTNA > Configurations > Identity Providers then Click on the orange button that says “New IdP”.

- Configure your Identity provider settings. Please refer to these articles for the examples.
- Enable the Auto provisioning toggle button.

- Once done, click "Save".
- Safous will automatically generate the necessary SCIM key credentials (Key (username); Secret (password); Token (bearer) and SCIM endpoint). The screenshot looks like this:
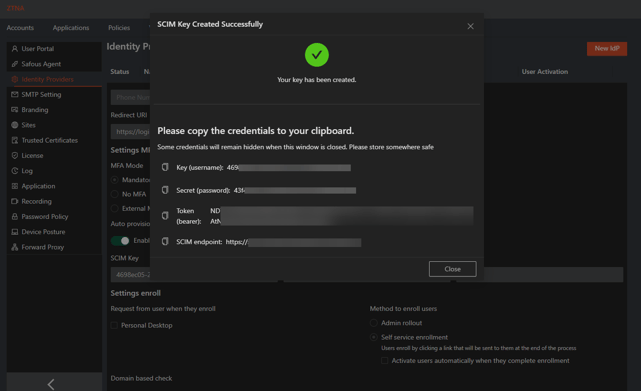
- Each of the credentials can be copied separately by clicking the copy icon next to the credential. Copy each of the credentials that are needed for the IdP and make sure you know where it can easily be located. Use these credentials to enter them into the external IdP provisioning page.
- To locate the SCIM key connected to the IdP, go to Settings > Configurations > Identity Provider. Click the + button next to the IdP name and scroll down to the Auto provisioning field. You will find the information previously copied (SCIM key, SCIM endpoint) in Step 11 and entered into the external IdP provisioning page. It also includes the last sync date.
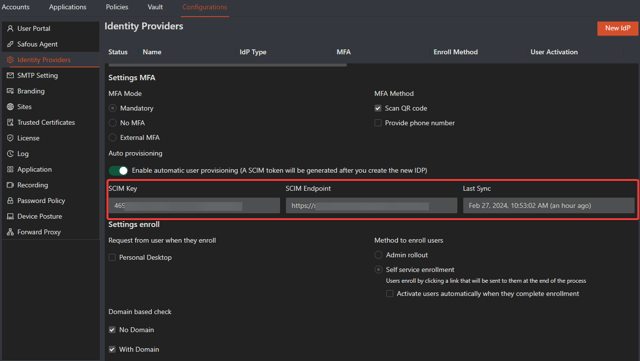
Please note that if you forget to copy the token details and close the page, you will have to delete the previous IdP and configure a new one. The previous SCIM token will also be deleted along with the IdP.
Troubleshooting
-
If you forgot to copy the token details as detailed in Step 11, and you close the page, you will lose the key information. You have to delete the previous IdP configuration and follow all the mentioned steps again to re-enable auto provisioning.
- If an IdP is deleted from the Settings > Configurations > Identity Provider screen, the SCIM token associated with the IdP is also deleted.
-
Deleting a profile from the Admin Portal does not mean that the same profile will be deleted on the linked IdP. Instead, that user will be reflected in the external IdP as de-activated.
Logs
-
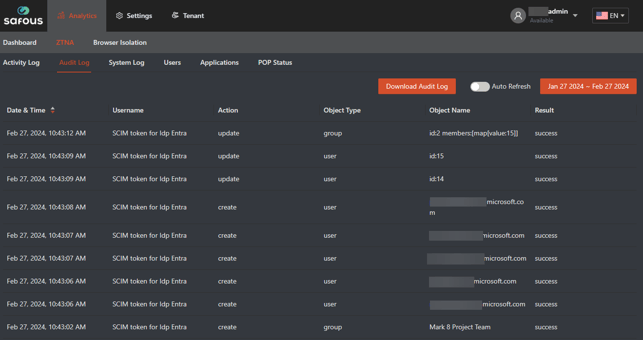
You can go to Analytics > ZTNA > Audit Log in the Admin console to find the logs events (create or update) for any change in the object. Update can mean that a user was de-activated. The number of ‘update’ messages may be larger than the number of actual changes performed in the IDP.
-
If App Gateway server is unavailable, the logs will be created on the external IdP.