- Go to Settings> ZTNA
- In Application, choose Applications
- Click New Application, then fill in the fields:
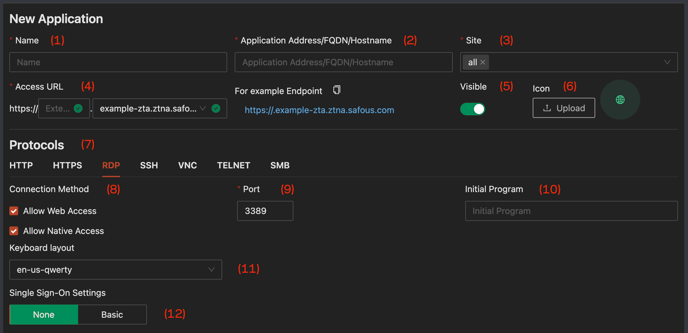
(1) Fill in Name information, which is the required field and must be a unique value compared to other applications.
(2) Fill in the Application Address/FQDN/Hostname for your internal business app that you will map by using IP format (192.168.1.100), FQDN (app1.coba.lan) or hostname (app1).
(3) Select Site is optional as you could leave it using "all", but for multisite deployment, choosing the correct site is recommended based on the application location.
(4) Access URL will automatically created based on Name, but it's customizable.
(5) Toggle Visible is enabled by default. If disabled, then the app will not appear in the user portal.
(6) The Icon will automatically populate if there is a standard HTTP/S application, but you can customize it by uploading the icon.
(7) Make sure to choose the RDP protocol.
(8) In the Connection Method, choose how you want the server to be accessed whether via the user portal (Allow Web Access) or via the RDP client (Allow Native Access).
(9) Port, by default use 3389 for RDP but it is customizable.
(10) If you want to publish some applications and not the whole server, go to the Initial program field to specify the names of the remote applications. The remote app format should be, for example, “app1, app2, app3” (with spaces), e.g., paint, wordpad.
If the Initial program is left empty, the RDP file is downloaded automatically with access to all applications in the remote machine.
If the Initial program has 1 application (e.g., “wordpad”) the RDP file will be automatically downloaded with the name of the application in the file extension (e.g., RDP_wordpad).
If the Initial program field has 2 (or more) applications (e.g., “wordpad,” “paint”), there is no automatic download. Instead, users will see a screen that offers them both applications as icons to chose from
(11) Keyboard Layout, the default keyboard layout is QWERTY. You can select other layouts from the dropdown menu, such as the Japanese keyboard layout (ja-jp-qwerty).
(12) Single Sign-On Settings is optional and can only be used with the user portal, you can leave it as None (no SSO), or set it to Basic with the options below:

- User logon credentials, can be used if the user's credential for the user portal is registered as the server's credential.
- Prompt user and store in personal vault, it will only ask for the password the first time the user login and then the credential will be saved in the user's Personal Vault.
- Assign secret from vault, can be used after you store a password in the Vault system.

(13) Category is optional, it is just to make a more organized application type tag which by default will use the uncategorized tag. For more information please find here
(14) Set up Policies to be applied to the application.
- Status: Set the status of the policy. Toggle on to enable, toggle off for disable.
- Accounts: Define the entities that should be applied to the policy.
- Condition: Select the access condition that should apply to the policy from the list of available conditions.
- Action: Select the configuration that should apply to the policy for the application based on its protocol from the list of available actions. More information about action can be found in this article: [PRA][ZTA] Policies/Actions
Note:
- RDP Applications using the Web-Access method can support recording and SSO
- RDP Applications using the Native-Access method can support recording and SSO if the feature "Enhanced Native RDP" is enabled.
- To enable it, go to Settings > ZTNA > Configurations > Applications. Then toggle ON "Enhanced Native RDP".
